Introduction
Tuna onigiri are savory Japanese rice balls filled with a flavorful tuna-mayo mixture, wrapped in nori seaweed, and perfect for lunchboxes, picnics, or quick snacks. A staple in Japanese cuisine, these portable treats combine sticky rice with a creamy, umami-packed filling, offering a delightful balance of textures and tastes. Their simple preparation makes them ideal for beginners and seasoned cooks alike, requiring minimal ingredients and no special equipment beyond a bowl and your hands. This recipe delivers authentic, handheld comfort food that’s as fun to make as it is to eat.
Ingredients
- 2 cups sushi rice (short-grain Japanese rice)
- 2 1/4 cups water (for cooking rice)
- 1 can (5 oz) tuna in water, drained
- 2 tbsp mayonnaise
- 1 tsp soy sauce
- 1/2 tsp rice vinegar (optional, for tang)
- 1/4 tsp salt (for rice)
- 2-3 sheets nori seaweed, cut into 2-inch wide strips
- Optional: 1 tsp sesame seeds or furikake, for garnish
- Optional: 1/2 tsp wasabi or sriracha, for a spicy kick
Step-by-Step Process
- Cook Rice: Rinse sushi rice under cold water until water runs clear. Combine rice and 2 1/4 cups water in a rice cooker or pot. Cook according to package instructions or bring to a boil, then simmer covered for 15 minutes. Let steam for 10 minutes. Fluff and mix in salt. Cool slightly until warm but not hot.
- Prepare Filling: In a small bowl, mix drained tuna, mayonnaise, soy sauce, and optional rice vinegar or wasabi/sriracha until well combined. Set aside.
- Shape Onigiri: Wet your hands with water and sprinkle with a pinch of salt to prevent sticking. Scoop 1/3 cup warm rice and flatten into a disc in your palm. Place 1 tbsp tuna filling in the center, then mold rice around it to form a ball or triangle. Press gently but firmly to hold shape. Repeat to make 6 onigiri.
- Wrap with Nori: Wrap each onigiri with a strip of nori, shiny side out, covering part or all of the rice. The nori will stick to the rice naturally.
- Garnish and Serve: Sprinkle optional sesame seeds or furikake on top. Serve immediately or wrap in plastic wrap for later. Enjoy at room temperature or slightly chilled.
Tips for Better Tuna Onigiri
- Use sushi rice for proper stickiness; other rice types won’t hold shape.
- Keep a bowl of water nearby to wet hands and prevent rice sticking.
- Cool rice slightly before shaping to avoid burning hands or mushy texture.
- Drain tuna thoroughly to prevent a soggy filling.
- Press onigiri firmly but not too hard to maintain a light texture.
- Cut nori just before wrapping to keep it crisp.
- Store in a cool place if not eating immediately to maintain freshness.
- Experiment with filling amounts to suit your taste.
Variations and Customization
- Spicy Tuna Onigiri: Add 1 tsp sriracha or chili oil to the tuna mix.
- Vegan Onigiri: Replace tuna with mashed avocado or umeboshi (pickled plum).
- Grilled Onigiri: Brush with soy sauce and pan-fry until crispy.
- Salmon Onigiri: Swap tuna for canned salmon or flaked cooked salmon.
- Kimchi Onigiri: Mix 2 tbsp chopped kimchi into the filling.
- Teriyaki Tuna Onigiri: Add 1 tsp teriyaki sauce to the tuna mix.
- Gluten-Free Onigiri: Ensure soy sauce is gluten-free or use tamari.
- Cheese Tuna Onigiri: Add 1 tbsp shredded cheddar to the filling.
Storage and Serving Tips
- Store wrapped onigiri in an airtight container or plastic wrap in the fridge for up to 1 day.
- Do not freeze, as rice hardens and loses texture.
- Serve at room temperature for best flavor; avoid reheating.
- Pair with miso soup, pickled vegetables, or green tea for a complete meal.
- Use leftovers as a base for fried rice or sushi bowls.
- Keep nori separate until ready to eat to maintain crispness.
- Avoid leaving at room temperature for more than 2 hours.
- Pack in bento boxes for a portable, authentic lunch.
Nutritional Information
Based on 6 servings (2 onigiri per person, 3 people total):
- Calories: 220 kcal
- Total Fat: 6g
- Saturated Fat: 1g
- Trans Fat: 0g
- Cholesterol: 15mg
- Sodium: 320mg
- Total Carbohydrates: 34g
- Dietary Fiber: 1g
- Sugars: 1g
- Protein: 8g
- Vitamin A: 2% Daily Value
- Vitamin C: 0% Daily Value
- Calcium: 2% Daily Value
- Iron: 8% Daily Value
Note: Nutritional values vary based on ingredient brands and optional add-ins. This dish is moderate in calories and fat, with protein from tuna. For dietary needs, try vegan or gluten-free variations. Its portable nature makes it a balanced snack or light meal.
Conclusion
This tuna onigiri recipe delivers a savory, authentic Japanese snack that’s both simple and satisfying, perfect for lunches, picnics, or quick bites. Its minimal ingredients and easy shaping process make it a favorite for home cooks. The creamy tuna filling and crisp nori create a delightful contrast with sticky rice. This recipe is sure to become a go-to, cherished for its portability and traditional appeal.
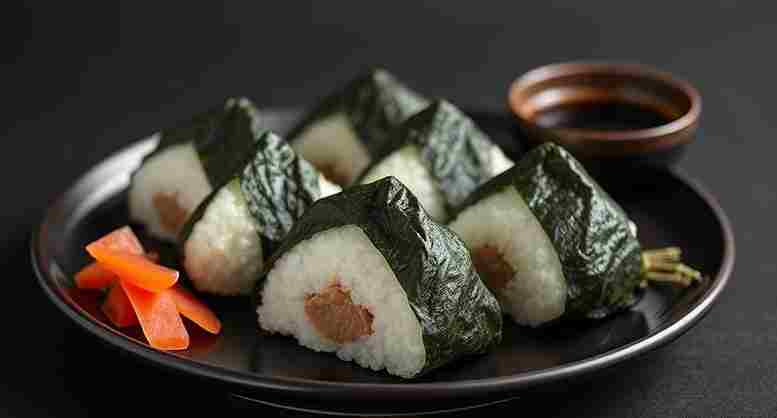
Tuna Onigiri Recipe: Savory Japanese Rice Balls
Ingredients
- 2 cups sushi rice short-grain Japanese rice
- 2 ¼ cups water for cooking rice
- 1 can 5 oz tuna in water, drained
- 2 tbsp mayonnaise
- 1 tsp soy sauce
- ½ tsp rice vinegar optional, for tang
- ¼ tsp salt for rice
- 2-3 sheets nori seaweed cut into 2-inch wide strips
- Optional: 1 tsp sesame seeds or furikake for garnish
- Optional: 1/2 tsp wasabi or sriracha for spice
Instructions
- Rinse and cook sushi rice with water; mix in salt and cool slightly.
- Mix tuna, mayonnaise, soy sauce, and optional vinegar or spice.
- Wet hands, scoop 1/3 cup rice, flatten, add 1 tbsp tuna, and shape into a ball or triangle. Repeat for 6 onigiri.
- Wrap each with a nori strip.
- Sprinkle with optional sesame seeds or furikake; serve or wrap for later.
Notes
- Use sushi rice for stickiness.
- Wet hands to prevent sticking.
- Keep nori crisp by wrapping just before eating.
- Serve with miso soup or pickles.